So you’re interested in mining cryptocurrency, but you’re not sure where to start? No problem, this guide is all you need to set up your own headless litecoin mining rig—even if you have absolutely no experience with this sort of thing.
First, let’s get the obvious question out of the way: why litecoins? After all, bitcoins are worth more, right? The simple answer is that at the time of this writing, litecoins are currently the most profitable cryptocurrency to mine when you take into account how much each coin is worth, and the time required to mine one. Rest assured that if the situation changes, and another cryptocurrency suddenly surpasses litecoin as the best mining option, the rig outlined in the guide should have no problem switching over to a new coin.
This guide will be broken into several parts, each focusing on a different aspect of building your first mining rig. First, let’s take a look at what you’ll need in terms of hardware to put a respectable miner together.
Build your own Litecoin Mining Rig, part 1: Hardware
4/06/2017: This guide is roughly three years old. Please don’t attempt to buy any of the hardware recommended here—it’s quite obsolete! If you’re looking for information about modern GPU mining, please click here for my updated 2017 guide on mining Ethereum.
Here is the list of hardware that I recommend:
| Motherboard | ASRock 970 Extreme4 |
$98 |
| Processor | AMD Sempron 145 |
$38 |
| Memory | 4GB G.SKILL DDR3 SDRAM (2 x 2GB) |
$46 |
| Power Supply | Seasonic 860w Platinum PSU |
$199 |
| GPUs | 3 x MSI Radeon HD 7950 3GB GDDR5 (Twin Frozr) |
$319 each |
| (optional) | 3 x PCI-E riser cable | $5 each |
| (for dummy plugs) | 68 ohm 1/2 watt resistors | $3 |
Update 11/26/2013: The Radeon 7950 video cards are sold out pretty much everywhere. They’re still the best option for mining if you can find them, but if you can’t, then the new Radeon R9 280X cards are likely your best option. They do consume a fair bit more power though, so you”ll want to upgrade your power supply as well (this 1250w Seasonic should support three 280X GPUs without problems). As for brands, I recommend these Sapphire, Gigabyte, and MSI 280X cards for now. I’ll be updating the rest of my guide at some point in the near future with optimal settings for the 280X, so stay tuned.
Update 12/01/2013: If you’re trying to put a rig together, you’ve probably noticed that the above video cards have become nearly impossible to find. I’ve received a few messages from folks that are having some good results using the R9 290 cards, although they’re a fair bit more expensive than the 280X. If you’re itching to build a rig ASAP and can’t find a 7950 or 280X, then you might consider the 290. It looks like all of the current 290 cards are using AMD’s reference cooling design at the moment, so brand probably doesn’t matter too much. Although given a choice, you usually can’t go wrong with Sapphire, Gigabyte, and MSI. Again, remember to pick up a fairly powerful PSU if you’re going to run 3 of these in a rig.
You will also need a USB stick (8GB or larger, this one is fine) if you’re using Linux as your OS, or a harddrive (a cheap SATA drive of any size will do) if you’re using Windows. I will cover setup on both Linux and Windows in the next sections of this guide, as well as the pros and cons of each.
The video cards may be difficult to find, as they’re popular and often sell out. You can substitute nearly any 7950-based GPU, but if you have a choice, go for the MSI or Sapphire cards. They’re not voltage-locked and will save you some electricity in the long run. I have the MSI card that I recommended in all of my rigs, but I’m told that this (and also this) Sapphire card is also a good choice.
The motherboard, CPU, and RAM are all relatively unimportant. The motherboard simply needs to have enough PCI-E slots to host your three GPUs (if the recommended board isn’t available, here is another, or if you can’t find either ASRock, this Gigabyte board is a good alternative). The CPU will essentially sit idle, as all of the actual mining is done by the GPUs. The Sempron 145 is an excellent choice here because it’s cheap and draws very little power (if the Sempron is unavailable, this one is also a fine choice). If you’re going with Linux, you can get away with even less than 4GB of RAM, but I’d stick to that as a realistic minimum on Windows.
The power supply is important, and you don’t want to skimp on it. The Seasonic that I’ve recommended is extremely solid and 93% efficient, which will help keep power consumption to a minimum. It’s also modular, which is really nice if you’re putting this together in a plastic crate like I recommend.
The PCI-E risers aren’t strictly necessary, as all 3 GPUs will fit on the motherboard without them. However, airflow will be extremely limited due to the close proximity of the cards, and I really don’t recommend setting them up that way long-term. The riser cables allow you to position the GPUs off of the motherboard in a more spaced-out fashion. I dropped the temperature of my GPUs by nearly 10 degrees Celcius by simply using risers to separate them. Availability and pricing on Amazon is constantly changing, so check eBay if you can’t find them.
Important: you may also need to create dummy plugs for each of your GPUs. Some operating systems will idle video cards that do not have an active monitor connection, which will obviously kill your mining performance. Dummy plugs “trick” your OS into thinking a monitor is connected, thus preventing attached GPUs from being idled. You just need a few resistors ($1-2 at Radio Shack if they’re not available at Amazon) and these instructions to create your own plugs.
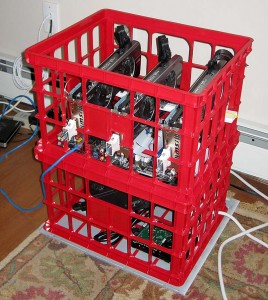
So you’ve got nearly $1400 worth of hardware, but no place to put it, as I haven’t mentioned a case. I highly recommend against trying to cram 3 GPUs into a conventional PC case. A plastic crate or two works far better due to the tremendous heat that the video cards will give off. Added bonus: they’re cheap!
Here is what you’ll need to create a simple DIY plastic crate housing for your miner:
| Plastic Crate |
$5 each |
| Plastic stand-offs | $4 |
| 6 x #4 3/8″ wood or metal screws | $1 |
| Brace to rest GPUs on (I used two of these) | $4 |
| a few cable ties (8″ or so) | $2 |
| power switch & LED (optional) | $6 |
You can get plastic crates in most home improvement stores if you don’t want to ship it from Amazon. I picked mine up at Lowe’s for under $5 each. You should be able to get everything else on the list at Lowe’s if you happen to have one near you, too. As far as tools go, you’ll need a drill and a knife capable of cutting into whatever plastic crate you buy.
Assembly Steps:
First, attach your CPU & heatsink/fan to your motherboard, and place your RAM into the memory slot(s). Then follow the general steps below to mount everything into your plastic crate.
Click the images for a close-up look at each step.
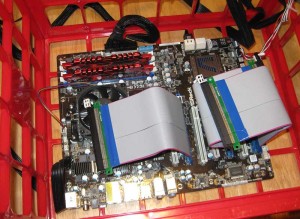 Place plastic standoffs on the bottom of your plastic crate, and rest your motherboard on top of them. Make sure that all of the essential ports are accessible (SATA, USB, keyboard, mouse, etc). Use your knife to cut away pieces of the crate if necessary so that all ports you plan to use are exposed. Then plug your riser cables into the PCI-E slots of your motherboard.
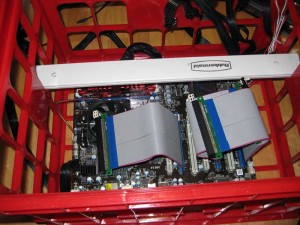 Place your brace (either the plastic guards that I recommended, or a cut yardstick, or whatever you have that works) so that it is sitting above the motherboard, high enough for your GPUs to rest on. Cut the brace so that an inch or two sticks out on either end of the crate.
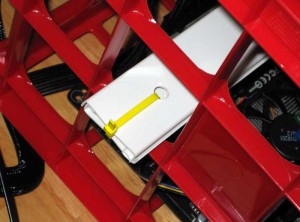 Drill holes in your brace so that you can secure it with cable ties (see image). Do not simply rest the brace on the crate! An accidental bump can cause it to fall into the crate, along with ~$1000 worth of GPUs if you do that!
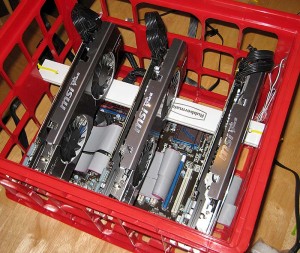 Connect each GPU to it’s corresponding riser cable, resting the bracket end on the lip of the crate and the other end on your brace.
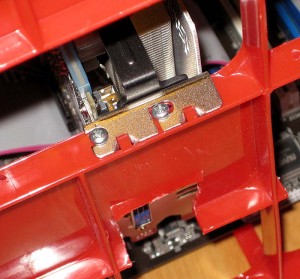 Screw each GPU down into the lip of the crate. If you drill small pilot holes ahead of time (mark where to drill with a sharpie), this is much easier.
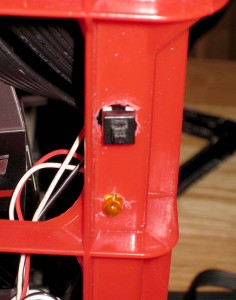 If you have a power switch and LED, mount them into one of the crate’s corners. I was pretty sloppy with mine, but it’s functional.
You’re done! Simply connect everything to your power supply and you should be ready to power your rig on for the first time. If you have a second crate, you can put your power supply in there (along with your harddrive if you’re using Windows), and stack it under your main crate to save some space.
In the next part of this guide, I’ll show you everything you need to do to start mining under Linux (and Windows will follow shortly after)!


 April 18th, 2013
  CryptoBadger
 Posted in
  Tags:
Tags: 


Being that there is a scarcity in 7950 gpu’s (in particular the MSI 7950 TF) which probably will not change because of newer product coming on the scene. It’s probably better to ask which how people are fairing mixing different 7950’s?
Mixing GPU brands shouldn’t cause any issues. I highly recommend sticking to either the MSI TF3, Gigabyte WF3, or Sapphire Vapor-X models, though. Going with a lesser model will likely result in a card that can’t match the performance of your existing TF3s. If that happens, it isn’t the end of the world, but you’ll need to pass cgminer individual settings for each GPU in your config file or startup script to prevent instability. For example, something like:
cgminer --scrypt -I 20,20,19 -g 1 -w 256 --thread-concurrency 21712 --gpu-engine 1050,1050,1000 --gpu-memclock 1250Would tell cgminer to run your first two GPUs at intensity 20 and 1050mhz core clock speed, and your third GPU at intensity 19 and a 1000mhz core clock. You can use comma-separated lists for most of the GPU parameters.
Would 3x Powercolor Radeon HD 7970 925MHZ 3GB 5.5GHZ be OK? I was able to pick them up for a discounted price (Recertified).
Great blog. I am getting into ltc mining and like the way you simplify everything!
Great article! Got my 7950’s on the way and was wondering if I could get your thoughts on this mobo as the one you recommend isnt readily available locally..
http://www.gigabyte.com/products/product-page.aspx?pid=4491#ov
Its got the 4 x PCI-e ports and all the goodies- Intel based though.
Thanks!
George
You’ve probably already made your purchase, but that board looks fine if you want an Intel-based build. I recommend a Celeron CPU for a dedicated miner – you’ll save power and keep your up-front costs down.
Hey Cryptobadger,
Will the Twin Frozer, MSI Radeon 7950 graphics cards work on an intel based board with a celeron cpu?
Absolutely. The CPU won’t really do anything except sit there and waste power, so I recommend getting the cheapest low-power CPU you can find, hence the Sempron recommendation in the guide. The Celeron isn’t a terrible choice if you already have an Intel platform you can use for mining, though.
Hi, This how-to inspired me to build my own rig.
I did make a couple of substitutions and they were as follows.
The 7950s were HIS Radeon 7950 as they were relatively cheap compared to others.
For the PSU I originally used a corsair Bronze 80 850TX enthusiast PSU but after finding out that it didnt have the legs to run the rig (it kept crashing both in Linux and under windows when the cards were under load) I substituted that for an XFX 1250W modular beast.
Running flawlessly now at 640Kh/s per card!
Clocked at 1100 on the engine and 1575 on the memory.
thread concurrency at 24000 with intensity at 20. running temps are held around 75C with auto-fan enabled in cgminer.
I have managed to undervolt the cards through flashing a new BIOS and have 2 running at 1.060V whilst a sweet card (the middle one) running at 1.020V.
Just need to see what the current draw is but not too bothered as I have a 4KW solar panel array which provides ample power through the day.
Thanks very much for the help.
Ade.
Thanks for the comment – that is really good undervolted performance out of HIS cards!
Just a quick update if anyone is interested.
I have lowered the engine to 1050 and the mem to 1250 as these speeds tend to draw less juice yet still provide around 620Kh/s each.
Another thing I did was remove the factory installed TIM and replaced it with some arctic silver (and a lot less of it than was plastered on the chip from the factory). Result is that temps are now running around 75C but the fan speeds have dropped to around 65 to 70% (Auto fan enabled).
I have measured the current draw at 3.02 Amps at the wall (240V UK) which gives me around 700 Watts at a PF(Power factor 0.99).
Doesn’t scrypt mining require that you have at least as much DRAM as what’s on the GPUs? Or did I misunderstand that?
There are mining applications that will use your system memory for mining operations instead of the memory built onto each GPU. Earlier versions of Reaper operated this way, and that is why many people still think you need a lot of RAM for scrypt mining. Cgminer uses GPU memory, so you really don’t need much system memory at all in a dedicated mining rig. I have a ~2000 Kh/sec 3×7950 miner that is running with 1GB of RAM in it just fine.
Thanks!
In terms of motherboard, is it of benefit that all 3x PCIe ports are all 16x, or does it make no difference that they would be 16x, 8x and 4x?
Pci 16 slots have the power to them… its also harder to get adapters… most motherboa4ds for pc’s dont have the x4 x8 slots what they are saying is the bandwidth is that when all pci16 slots are filled. Mining does not use that much bandwidth so thats oks
Makes no difference at all for mining. If you plan to use the GPUs for anything else (gaming, etc), then you’d want 16x PCIe slots as the bandwidth limitations of the lesser interfaces would quickly become apparent.
hey ok,
So in terms of mining it would be okay to get a 1x to 16x riser extension and to plug the MSI Radeon TF 7950 into one of the PCIe 1x slots?
I know the video output would be bad for gaming but are you also saying that this would not reduce the performance of the graphics card for mining?
thanks Joe – trying to buy and build now
That’s correct. For mining using a 1x PCIe slot (with 1x -> 16x riser cables) will not reduce performance at all.
Hey Cryptobadger,
Thank you so much for all of your help and contributions to the crypto mining industry.
I am having a problem setting up my remote desktop connection. I am using a macbook pro and trying to connect to my pc mining rig and its xubuntu operating system. I put in the ip address into the putty application and I just get an error message saying that the network connection was refused.
Do you have any idea what I need to do to get the connection accepted. This is the final part of my setup and so I am eager to get it accomplished.
If Putty says connection refused (as opposed to just a timeout), then it sounds like you have the IP address correct. Two likely possibilities:
– SSH isn’t installed on your rig, so the connection is being refused by default. I assume you already installed SSH, but just double-check.
– The connection request is going through a router, and you haven’t specified that port 22 (SSH) should be directed to your mining rig’s IP address, so your router’s firewall is refusing the connection. If both computers are on the same local area network, then normally all connections are allowed, but you may have your router locked down a bit more tightly (or maybe you’re trying to connect via the internet using a DNS name or something). Check your router’s administration area, and check that there is nothing preventing a connection from being established. Just make sure that if you do allow requests from the internet to your rig, you use a strong Xubuntu login password!
Restart min8ng rig… had to do that for mine
Hey C-B,
Thanks for the reply.
Yes I input the “sudo apt-get install openssh-server byobu” code so it is not your first suggestion.
2nd you say:
– The connection request is going through a router, and you haven’t specified that port 22 (SSH) should be directed to your mining rig’s IP address, so your router’s firewall is refusing the connection. If both computers are on the same local area network, then normally all connections are allowed, but you may have your router locked down a bit more tightly (or maybe you’re trying to connect via the internet using a DNS name or something). Check your router’s administration area, and check that there is nothing preventing a connection from being established. Just make sure that if you do allow requests from the internet to your rig, you use a strong Xubuntu login password!
I loaded my router settings in mozilla and specified port 22 be directed to the i.p. address of my rig.
Still I get “connection refused.” I tried enabling all permissions in the settings of the router to ensure that it is not locked down tightly. I don’t know what a DNS name is. I cannot find anything that would prevent a connection from being established. Do you have any other ideas or can you point me to someone or something that could help me get this SSH up? This has been terribly taxing. I really want to get this remote access. It sounds so easy to do in your guide lol!
Why not a pair of 7990’s? It seems most of the early objections were due to cost, but the Gigabyte 7990 is going for $600 now. You’d have to up the PSU to a 1200W, but shouldn’t you be able to get more than 2.5 MH, which would come out about the same as four 7950’s in terms of hast/watts/cost?
A few people on the bitcointalk forums have posted their results after giving 7990 mining a try, and they still don’t compare favorably to the 7950. They’re essentially two 7970 GPUs on a single card with slightly lower power consumption – but not low enough to beat the hash/power ratio that the 7950 provides.
They’re not a terrible choice, especially if you can get a deal on the price, but the 7950 is still king, and probably will be for awhile. If you do go for the 7990, be prepared to spend a bit more time getting them tuned for optimal mining – the 7970s are notorious for being a pain to set up properly.
So, I did try two 7990’s with a 1300W PSU–not sure what I did wrong, but the two cards went crazy, hit over 101C temp with fans at 100%, and according to kill-a-watt, I was pulling well over 1300W from the wall! Room lights started flickering badly, and I thought it was going to catch on fire! 🙂
I had cgminer at 20 intensity and 21712 thread concurrency, and the card settings at stock.
For now, I’ve got one card running, scaled back the intensity to 13 and thread concurrency down to 8192, lowered the power -8% and memory clock to 500 MHz (via Catalyst Control Center), and it’s so far stable at about 1100Kh combined, with temps around 80C @ 70% fan. I’m going to try and push it up to see if I can hit around 1250Kh.
Anyone have any idea what went wrong? It shouldn’t be possible that two 7990’s should be pulling that much power, should it?
Thinking back, two 7950’s have one definite cooling advantage for sure–there are 4 fans total to the 3 on the 7990, plus the physical separation of the GPUs.
I haven’t used a 7990 myself, but they’re essentially two 7970s in a single package. Google (or check the bitcointalk forums) for good 7970 cgminer settings and use those – I’m pretty sure you can’t use intensity 20 with a 7970, so that is probably where your initial issue came from. I’d expect that you can get 200-300 Kh/sec more out of the card with optimal settings. Good luck!
Hi can I use one sapfire and two msi cards? Thank You for answer.
No problem… I run 2 sapphire and a powercolor. Your running the cards pretty much individually not in sli
Thank You very much.
Thanks for the help.
I am awaiting a few more components to actually build the rig complete, however I did purchase the 3x MSI TwinFro 7970 3GB OC cards instead of the 7950’s as the 7970’s were slightly cheaper in the deal I got. I am playing with one of these in my current system which only has a 500W corsair PSU in it, but am mining comfortably at about 690kH at about 75degC – and can get 720kH no sweat heatwise but I think the PSU cant handle that much so I get some instability……:)
In any case, a couple of weeks from now the rig should be complete and am hoping for 2100kH I guess, but we will see.
I found the guide very useful and thanks for that. One note though – those crates you use are VERY hard to find in the UK so have managed to source one at ridiculous expense but may just create something else depending on what/when it arrives etc.
Would you say 7970’s were a mistake at a slightly cheaper price point than 7950’s by the way? (I guess the 7950’s are getting some demand spikes from the mining guide of yours…lol)
Going with the 7970 over the 7950 isn’t necessarily a mistake, per se. The 7950s are more efficient (they offer a superior hashrate to power consumption ratio), but if the difference in up-front price was significant, or if power is especially cheap in your area, the 7970 isn’t a terrible option. Just make sure that you get a much beefier power supply – the 7970 uses significantly more power than the 7950.
Hi guys!
Great “How-To” u got here!
I went through your part list and selected similar parts at a local dealer here in switzerland.
I didn’t bought the rig at the moment, just was playing around with Performance/Price.
Now i have a setup and was wondering what you guys think about it.
What could be expected from this rig?
Price: $1445 (similar to your rig)
CPU: Intel Pentium G3220 BOX
MB: AsRock Z87 Extreme4
RAM: 4GB Kingston HyperX (2×2 GB)
Power: Seasonic M12II 850W
GPU: 3 HIS HD 7950 IceQ Boost
“Harddrive”: 16GB Sandisk Cruzer Edge
All fits in a “Cooler Master HAF XB Cube” Case.
It hase a great air-flow and the ability to put in more fans.
Front: 2x 120mm Lüfter
Rear: 1x 120mm Lüfter (optional), 2x 80mm Lüfter (optional)
Top: 1x 200mm Lüfter (optional)
I’ll use a case because i dont want to have an Rig looking like “Scrap-Parts” in my flat 🙂
You can probably expect results that are pretty similar to the rig that I outline in my guide. The HIS cards don’t perform quite as well as the top-end MSI/Gigabyte/Sapphire cards, but they’re certainly not a bad choice, especially if they’re significantly cheaper than the alternatives.
The Intel Celeron platform uses a bit more power (and is a bit more expensive up front) vs the AMD Sempron, but again the difference is relatively minor.
You may have an issue with heat packing all of that hardware into an enclosed case. I know that some people build rigs around that Cooler Master case, but they typically stick to only 2 GPUs. It can probably be done if you pack enough fans into the case, but remember that each of those fans is going to consume a bit of power, and they’re going to probably be quite noisy. I understand the “scrap part” look of the plastic crate is unappealing, but it really does work quite a bit better than trying to use a traditional PC case – it also doubles as a conversation piece. =)
[…] Outstanding how-to guide with great pics including a detailed list of materials for assembling a litecoin mining rig. […]
Hey, just a quick question, where do the plastic bumpers go on the crate? Do I just put them under the mother board where it sits on the crate or what? I’m also having a hard time finding them on amazon.com, best I could find was this http://www.amazon.com/gp/product/B000Z7DBLS/ref=ox_sc_act_title_5?ie=UTF8&psc=1&smid=A2OJRD1XT48IRI
If that works lemme know, or please link me to an amazon.com link that would work for bumpers 🙂
These should work fine.
And yup, you just stick them to the floor of the inside of the crate, and then sit the motherboard on top of them. If you like, you can also use some cable ties to secure the motherboard to the crate bottom so it doesn’t move around (just run the ties through the motherboard screw holes and around any part of the crate). Not strictly necessary, but it does help tidy things up and prevent the possibility of damage if you’ll be moving the rig around a lot.
I just used a couple paint stirrers I got for free to offset everything. Untreated wood. Dont have to get fancy just make sure whatever you use doesnt conduct
[…] on April 18, 2018 – Outstanding how-to guide with great pics including a detailed list of materials for assembling a litecoin mining […]
Hi Cryptobadger,
Thank you for this great guide. I am planning to build one. Got a dummy question; you write “Place plastic standoffs on the bottom of your plastic crate”. What best to use as plastic standoffs? Would you have an image what you used/how you attached it?
Cheers
Hey Wes,
I just had the same question. If you look up a bit in the comments you’ll see my question! He linked me to these standoffs http://www.amazon.ca/exec/obidos/ASIN/B001WAK6DS/crypto0dd-20
Thanks Mitch, you are right! Sorry for the double post.
The mentioned MSI GPU is not available anymore in our country. They do offer as an alternative the Sapphire R9 280X 3GB GDDR5 OC DUAL-X. Would that be any good?
What GPU would you recommend as best alternative?
thanks and cheers,
wes
If possible, I’d try to get any Radeon 7950 GPU – both the Sapphire Vapor-X model and the Gigabyte WF3 are excellent alternatives to the MSI. If you can’t get any 7950, then the 280X isn’t a bad choice.
hey,
does anybody have experience with working out two PSU’s?
I’ve got four cards set up, but can’t figure out how synchronically start the PSU. s
I just bridge the atx plug and have the slave power supply run all the time or whenever you switch it on. you can find atx pinouts on google. this method is used when you are leak testing a watercooled computer
Hi guys.
I want to buy a computer for mining litecoines or bitcoins and I have several questions.
1.is the action of the mining working on the RAM memory of the graphics card or on the inteface of the graphics card?
2.what is the graphics card are you recomended to buy for mining? maybe the ATI rendom 7970?
3.How much Power Supply I need?
4.when I porchase motherbord what is the most importent thing I need to notice?
5.when I porchase Processor what is the most importent thing I need to notice?
Thank you very much for your time.
By way of mentioning, some of this hardware is not available in the US anymore. I was wondering what steps I could take from here or if there will be an updated guide or something coming in the future to ensure that. Thanks.
The Radeon 7950 GPUs are the only hardware components that you’ll likely have a hard time finding – everything else should still be readily available. Unfortunately the 7950 is being phased out, and the replacement cards aren’t quite as good for mining. You probably won’t be able to get the MSI TF3 7950s any more, but Amazon still appears to have a decent stock of Sapphire Vapor-X 7950 GPUs. These are excellent cards – they’re built like tanks and they’re virtually silent (at least by comparison to the MSI cards).
Thank you for your advice CryptoBadger! What do you think of the suitability of CLUB3D Radeon HD 7950 ? There seem to be plenty of those too…
Great article and looks like a fun project to set up. What I’m having a hard time with is to estimate the electricity costs. Could you give an estimation of how much power one of these rigs uses per month, so I can see when roughly the effort will pay off? Many thanks for your help!
http://www.maximintegrated.com/design/tools/calculators/general-engineering/energy-cost.cfm
Try this calc… I have 8 cents kilowatt so I use about $500 dollars a year for my 3 gpu rig
I think you can estimate. The bulk of your electricity costs will be the GPUs. Unless I’m mistaken, the 7950 should draw close to 200W at full tilt, so 3x, 600W. The Sempron 145 is 45W at max TDP. If you were to just round up to, say 700W (for fans, HD, etc.), that’s how much per hour, so say 0.7 KWh. Multiply that by your electricity KWh rate (from your utility bill). Multiply that by 24 and you get your daily cost.
Unless you’re paying some ungodly prices for electricity, you should come out ahead (for now). Eventually, though, the difficulty will rise to a point when it may not be, or LTC/USD value could drop to make it unprofitable.
Or just buy BTC/LTCs instead with the cash for the rig. You’ll probably make a lot more money that way. 🙂
Would it make sense to use old Dell Optiplex that i already have as rig housing?
I can swap out power supply and add memory. I can use use 1 PCIe 16x and 2 PCIs 1x (with converter to 16x).
It seems like that might save me money on the initial set-up, but I’m not sure if I’m missing anything.
Thanks!
That should work great… just get a new powersupply. I am doing the same… have a stack of p4 2.8ghz dells with 1 16x and 2 1x pcie slots. I would change or re oil thw fan on the cpu just a good idea.
Posting from phone sorrt for typo and bad grammer
Wow funny how you wrote this in April and didn’t get comments until November since this is the biggest increase for the coins!
Thank you Crypto for an awesome guide I got a few questions:
1. I noticed this guide only supports up to three GPU’s as it looks like the milk crate will not have any more space to support another one, let alone have the space to dispassionate the extra heat. So my question is:
is it better to find a modified way to fit more gpus in the rig, or is it cheaper to build another 3x GPU milk crate rig all together?
You must be enjoying the traffic 🙂 but damn I love what you write about very inspiring! Thanks!
shit i didn’t realize there was an older comments link lol i was wondering if I read all 300 comments so quickly!
by the way i realize that you promote cgminer for our operations but apparently the new version of cgminer won’t have GPU support anymore. What is your opinion on this? perhaps it can be a new blog post!
https://forum.litecoin.net/index.php/topic,6925.0.html
I have an old pentium 4 rig; 4GB RAM, 1 PCI-e x16 slot & 3 (full size) PCI slots. If CPU processing power & PCI bus speed doesn’t matter, would this work as a “GPU host”? Design power on the chip is 68 watts, which is more than the Sempron, but at my electricity rates that’s only a $16 difference per year.
And I would LOVE to repurpose this thing – I can’t throw out a working computer. or old cables. or drives.
Mobo is an Asus P5B-VM SE if that helps.
D’oh! pulled out the wrong box – it’s an MSI PM8M-V
Yes, I still have the box for the motherboard – I told you I don’t throw stuff out 🙂
I should work fine with new power supply
Hey how did you guys manage to ground the system while using the milk crate? Did you just strap the PSU to something or what?
Can you help me?
I used your tutorial and my rig still not working. I made a video:http://www.youtube.com/watch?v=4FD5NbY6jtU&feature=youtu.be
I have tried Linux still the same thing. Have tried many thins to change, afterburner settings, cgminer settings… Nothing helps. Have tried to work with each of GPU, than everything goes ok, but when i Connect 2 of them or 3, then system crash.
Any ideas?