So you’re interested in mining cryptocurrency, but you’re not sure where to start? No problem, this guide is all you need to set up your own headless litecoin mining rig—even if you have absolutely no experience with this sort of thing.
First, let’s get the obvious question out of the way: why litecoins? After all, bitcoins are worth more, right? The simple answer is that at the time of this writing, litecoins are currently the most profitable cryptocurrency to mine when you take into account how much each coin is worth, and the time required to mine one. Rest assured that if the situation changes, and another cryptocurrency suddenly surpasses litecoin as the best mining option, the rig outlined in the guide should have no problem switching over to a new coin.
This guide will be broken into several parts, each focusing on a different aspect of building your first mining rig. First, let’s take a look at what you’ll need in terms of hardware to put a respectable miner together.
Build your own Litecoin Mining Rig, part 1: Hardware
4/06/2017: This guide is roughly three years old. Please don’t attempt to buy any of the hardware recommended here—it’s quite obsolete! If you’re looking for information about modern GPU mining, please click here for my updated 2017 guide on mining Ethereum.
Here is the list of hardware that I recommend:
| Motherboard | ASRock 970 Extreme4 |
$98 |
| Processor | AMD Sempron 145 |
$38 |
| Memory | 4GB G.SKILL DDR3 SDRAM (2 x 2GB) |
$46 |
| Power Supply | Seasonic 860w Platinum PSU |
$199 |
| GPUs | 3 x MSI Radeon HD 7950 3GB GDDR5 (Twin Frozr) |
$319 each |
| (optional) | 3 x PCI-E riser cable | $5 each |
| (for dummy plugs) | 68 ohm 1/2 watt resistors | $3 |
Update 11/26/2013: The Radeon 7950 video cards are sold out pretty much everywhere. They’re still the best option for mining if you can find them, but if you can’t, then the new Radeon R9 280X cards are likely your best option. They do consume a fair bit more power though, so you”ll want to upgrade your power supply as well (this 1250w Seasonic should support three 280X GPUs without problems). As for brands, I recommend these Sapphire, Gigabyte, and MSI 280X cards for now. I’ll be updating the rest of my guide at some point in the near future with optimal settings for the 280X, so stay tuned.
Update 12/01/2013: If you’re trying to put a rig together, you’ve probably noticed that the above video cards have become nearly impossible to find. I’ve received a few messages from folks that are having some good results using the R9 290 cards, although they’re a fair bit more expensive than the 280X. If you’re itching to build a rig ASAP and can’t find a 7950 or 280X, then you might consider the 290. It looks like all of the current 290 cards are using AMD’s reference cooling design at the moment, so brand probably doesn’t matter too much. Although given a choice, you usually can’t go wrong with Sapphire, Gigabyte, and MSI. Again, remember to pick up a fairly powerful PSU if you’re going to run 3 of these in a rig.
You will also need a USB stick (8GB or larger, this one is fine) if you’re using Linux as your OS, or a harddrive (a cheap SATA drive of any size will do) if you’re using Windows. I will cover setup on both Linux and Windows in the next sections of this guide, as well as the pros and cons of each.
The video cards may be difficult to find, as they’re popular and often sell out. You can substitute nearly any 7950-based GPU, but if you have a choice, go for the MSI or Sapphire cards. They’re not voltage-locked and will save you some electricity in the long run. I have the MSI card that I recommended in all of my rigs, but I’m told that this (and also this) Sapphire card is also a good choice.
The motherboard, CPU, and RAM are all relatively unimportant. The motherboard simply needs to have enough PCI-E slots to host your three GPUs (if the recommended board isn’t available, here is another, or if you can’t find either ASRock, this Gigabyte board is a good alternative). The CPU will essentially sit idle, as all of the actual mining is done by the GPUs. The Sempron 145 is an excellent choice here because it’s cheap and draws very little power (if the Sempron is unavailable, this one is also a fine choice). If you’re going with Linux, you can get away with even less than 4GB of RAM, but I’d stick to that as a realistic minimum on Windows.
The power supply is important, and you don’t want to skimp on it. The Seasonic that I’ve recommended is extremely solid and 93% efficient, which will help keep power consumption to a minimum. It’s also modular, which is really nice if you’re putting this together in a plastic crate like I recommend.
The PCI-E risers aren’t strictly necessary, as all 3 GPUs will fit on the motherboard without them. However, airflow will be extremely limited due to the close proximity of the cards, and I really don’t recommend setting them up that way long-term. The riser cables allow you to position the GPUs off of the motherboard in a more spaced-out fashion. I dropped the temperature of my GPUs by nearly 10 degrees Celcius by simply using risers to separate them. Availability and pricing on Amazon is constantly changing, so check eBay if you can’t find them.
Important: you may also need to create dummy plugs for each of your GPUs. Some operating systems will idle video cards that do not have an active monitor connection, which will obviously kill your mining performance. Dummy plugs “trick” your OS into thinking a monitor is connected, thus preventing attached GPUs from being idled. You just need a few resistors ($1-2 at Radio Shack if they’re not available at Amazon) and these instructions to create your own plugs.
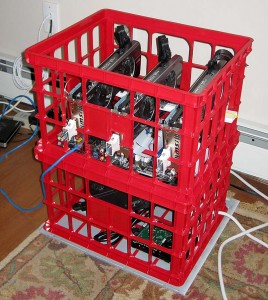
So you’ve got nearly $1400 worth of hardware, but no place to put it, as I haven’t mentioned a case. I highly recommend against trying to cram 3 GPUs into a conventional PC case. A plastic crate or two works far better due to the tremendous heat that the video cards will give off. Added bonus: they’re cheap!
Here is what you’ll need to create a simple DIY plastic crate housing for your miner:
| Plastic Crate |
$5 each |
| Plastic stand-offs | $4 |
| 6 x #4 3/8″ wood or metal screws | $1 |
| Brace to rest GPUs on (I used two of these) | $4 |
| a few cable ties (8″ or so) | $2 |
| power switch & LED (optional) | $6 |
You can get plastic crates in most home improvement stores if you don’t want to ship it from Amazon. I picked mine up at Lowe’s for under $5 each. You should be able to get everything else on the list at Lowe’s if you happen to have one near you, too. As far as tools go, you’ll need a drill and a knife capable of cutting into whatever plastic crate you buy.
Assembly Steps:
First, attach your CPU & heatsink/fan to your motherboard, and place your RAM into the memory slot(s). Then follow the general steps below to mount everything into your plastic crate.
Click the images for a close-up look at each step.
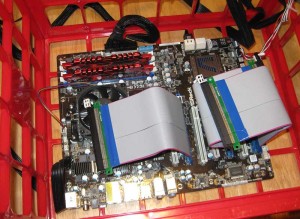 Place plastic standoffs on the bottom of your plastic crate, and rest your motherboard on top of them. Make sure that all of the essential ports are accessible (SATA, USB, keyboard, mouse, etc). Use your knife to cut away pieces of the crate if necessary so that all ports you plan to use are exposed. Then plug your riser cables into the PCI-E slots of your motherboard.
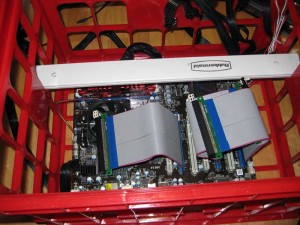 Place your brace (either the plastic guards that I recommended, or a cut yardstick, or whatever you have that works) so that it is sitting above the motherboard, high enough for your GPUs to rest on. Cut the brace so that an inch or two sticks out on either end of the crate.
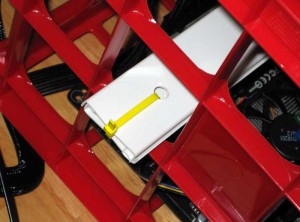 Drill holes in your brace so that you can secure it with cable ties (see image). Do not simply rest the brace on the crate! An accidental bump can cause it to fall into the crate, along with ~$1000 worth of GPUs if you do that!
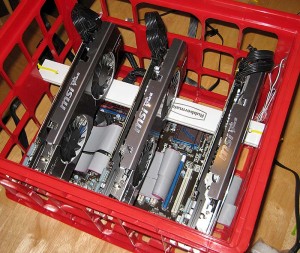 Connect each GPU to it’s corresponding riser cable, resting the bracket end on the lip of the crate and the other end on your brace.
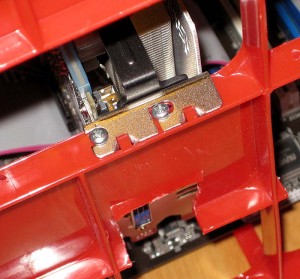 Screw each GPU down into the lip of the crate. If you drill small pilot holes ahead of time (mark where to drill with a sharpie), this is much easier.
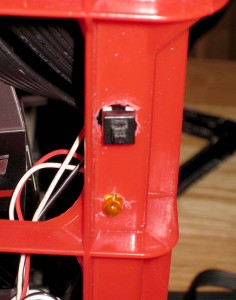 If you have a power switch and LED, mount them into one of the crate’s corners. I was pretty sloppy with mine, but it’s functional.
You’re done! Simply connect everything to your power supply and you should be ready to power your rig on for the first time. If you have a second crate, you can put your power supply in there (along with your harddrive if you’re using Windows), and stack it under your main crate to save some space.
In the next part of this guide, I’ll show you everything you need to do to start mining under Linux (and Windows will follow shortly after)!


 April 18th, 2013
  CryptoBadger
 Posted in
  Tags:
Tags: 


Just Stopped by to say this guide is amazing! I currently have 4 GPUS working on my rig. CypotB is the man
http://imgur.com/ySNzkHu my cgminer
http://i.imgur.com/Hib9lyj my rig
Dude, do you have the guide?
write me plz, im about to buy the parts on amazon
Pretty sure he was talking about this guide…. you can add a 4th GPU easily if you just get a bigger PSU and one powered riser. Check CryptoBadger’s FAQ…
Hello Cryptobadger,
Thank for your website. I assembled a rig with t a customised aluminum frame and I am mining using CGMIner. I have decided to put a fourth card and I therefore have a Seasonic Platinum 1000w PSU.
I was just wondering if you could tell me if my connections plans are OK.
I have bought a Powered PCIe 1x riser. I was thinking of connecting the molex to the ones being used to provide power to the CDWriter & SSD drive. Would that be OK?
For the GPU, I am planning to connect it using the 6PIn to 2x4pin molex connector provided. How can I connect them to the PSU? I have all the hardware you recommended.
Thanks!
1000w should be ok for 4 7950 GPUs if you’re undervolting, but you’ll be running pretty close to 100% utilization, especially if you have miscellaneous stuff hooked up like an optical drive and extra case fans. Just keep an eye on power consumption with a kill-a-watt or something similar.
Connecting your powered riser to the same molex plug that your drives are on should be fine.
If you’re out of connections on your PSU, you may need to order some more molex splitters and/or molex -> pci-e converters.
Hi Cryptobadger,
I got a kill-o-watt. at the moment I am at 730 w with three cards so I should be fine with four.
Just to be sure, do you mean splitting the PCIE connectors or plugging the card to the IDE Peripheral/SATA connectors?
Thanks!
If I understood your original comment correctly, I believe you were out of cables from your PSU to power your video card. The easiest solution would be to simply convert some of your molex connectors into PCI-E power connectors (via the molex -> PCI-E converters I linked). You’d only need to split molex connectors if you didn’t already have enough to convert. Hope that’s clear!
Hi Cryptobadger,
Got it running with the 4 GPUs. Pulling around 915 watts from the wall. Set it at 1031/1375 with 1.038 undervolting. Seems stable enough.
Thanks!
PS: I will donate some of my first coins!
Very nice – 915w is less than many 3 GPU rigs pull! =)
Many thanks to you… A very very informative as well as clear guide. Ordering the parts now. Hopefully finish building by next week. I certainly owe you a drink.
Cheerz Keep it up
And btw any thoughts for Gigabyte Radeon HD 7950 ? instead of your recommended once as I am getting a cheaper deal on eBay ? Response much appreciated.
As SkyNet mentioned, the Gigabyte cards are voltage-locked, which is usually a pretty big drawback. They’re good performers though, so if you’re comfortable flashing the BIOS they can be a good option (I use these in the custom rigs that I sell, in fact).
Gigabytes are voltage locked cards. There are cases where people where able to undervolt them using custom BIOS.
If you plan to undervolt in order to save up on electricity, then this should not be your choice
Well Crypto this is an excellent guide. I’ve started my build following it. I had to opt for a case however as I have wall to wall static electricity. I ran into a little problem as there’s almost not enough space in the case for all three cards, but I think I can solve that problem with one riser and maybe some duct tape (well something as an anchor anyway). I used an Antec Eleven Hundred because it’s large enough for all the cards and has plenty of fan space. It’s about 75% completed and I’ll post some pics up here soon once I get everything running.
Oh also I decided to buy these two items also, it’s more of an investment, another 250 dollars but well worth it I think.
A voltage regulator
http://www.amazon.com/gp/product/B00009RA60/ref=oh_details_o02_s01_i00?ie=UTF8&psc=1
and a battery backup
http://www.amazon.com/gp/product/B00429N19W/ref=oh_details_o01_s00_i00?ie=UTF8&psc=1
I have the voltage regulator set at 110v and the battery backup plugged into it. It now reads a nice clean 110v to my spiffy new and slightly expensive computer.
Cheers 🙂
hi, would the Seasonic X-850 80Plus Gold 850W be a good replacement? thanks.
The Seasonic 850W PSU will work fine, assuming you’re undervolting. You’ll draw very slightly more power from the wall than you would vs the Platinum PSU that I recommend, however.
I’m honestly not sure if 1/4 watt resistors will work in dummy plugs or not. People have reported a wide variety of resistor ranges working, but I’ve only tried 1/2 watt 50-100 ohm resistors myself.
also would 1/4 watt resistors work aswell? thanks again
Hey,
Thanks for your writeup! I followed almost everything here with a few deviations from your recommendations for my own personal choices, but it still works great! One problem I’m still struggling with is my dummy plugs. I’m using 68ohm 1/2 watt resistors placed correctly in a DVI-VGA adapter, and my drivers aren’t recognized when I remote-in to the rig.
I have to physically plug in a live monitor to manage my MSI Afterburner settings, overclock, etc… Its very frustrating! Any suggestions?
TL:DR
68ohm 1/2 watt resistors don’t work in dummyplug setup. Have also tried this http://blog.zorinaq.com/?e=11 which didn’t work either. Drivers won’t get recognized unless actual monitor is plugged in.
Thanks for help in advance
What are you using to remote in with? If you’re using the built-in Windows Remote Desktop, try something else – TightVNC is great (and free). Windows Remote Desktop is known to mess with video drivers.
I’m actually using 68ohm 1/2 watt resistor dummy plugs on one of my own rigs (most of them don’t actually require dummy plugs; I have one older Windows box that does) without issues.
Do you know which cards/mobos/OSs DO anddon’t require dummy plugs these days? Looking at several forums, it looks like most running modern drivers/software shouldn’t seed dummy plugs anymore?
Yup, that’s true – in most cases you shouldn’t need to use dummy plugs. None of my current rigs require them, but one of my early linux-based rigs (Xubuntu 12.04) did need them. You’ll know pretty much right away if they’re required because the GPUs that aren’t plugged into a monitor will be underclocked by the OS to save power, to the point of being useless for mining.
Could I run a radion 6990 with this power supply?
The 6990 consumes almost 500 watts under full load, so the Seasonic 860w PSU will be more than sufficient to power a single card along with ~300 watts of additional system components (plenty for a typical motherboard/CPU/RAM/drives combo).
I am looking at buying 4 7950’s for my new mining rig. quick question, does the clock speed make much difference to the hash rate? the only reason I ask, is that the ones i’m looking to buy are clocks of about 830Mhz. However, there is one that is 900Mhz. Im trying to establish if the cost difference will be worth it.
Many Thanks,
Yes, higher clock speeds typically translate to higher hashrates. Exactly how much of an increase you get depends on the brand/version of GPU, and the rest of your mining environment, but it’s usually pretty significant.
Keep in mind that you’ll usually be able to overlock your GPUs a good bit higher than their stock settings. You’ll likely be able to clock the 900Mhz version higher than the 830Mhz ones. If you’re planning to use the cards in a dedicated mining machine, then unless the price difference is huge, it probably makes more sense to spring for the 900mhz cards – they’ll perform better and likely be more stable as well.
@CryptoBadger Can you please provide some pointers for voltage hacking the GPU bios? I promise I wont blame you if I brick a card! I’m a fairly technical user, running Linux and I’ve read in various forums that under Linux the cards pretty much ignore what cgminer tells them about voltage)
While I’m not comfortable putting up a tutorial covering creating a hacked BIOS with a hex editor, there are a few people that are now making their own custom undervolted BIOSes available. I’ll probably link to some of them in my guide after giving them a thorough testing at some point.
In the meantime, if you Google “7950 custom bios” you’ll find a few reputable people that are offering up their own hacked GPU BIOSes for download. Just make sure that you have the exact same hardware (check the revision # printed on your GPU’s PCB) as the person making the BIOS available. I also highly recommend NOT trying this at all unless your GPU has dual BIOS (flip over to the second BIOS when flashing, switch back to the primary if it doesn’t work).
Thanks for the pointer! The cards I’m eyeing do have dual bios and my plan moving forward is to only ever go with dual bios cards, for just this very reason.
Thanks CryptoBadger.
I’m following your guide at the moment, its been a great help! I will forward some donations shortly.
One Last quick question if you dont mind!
Assuming that I go for these 900Mhz Cards, what would the typical hash rate be per card?
Thanks,
It depends on the brand and how far you overclock them past their stock settings.
Most of the 900mhz 7950 GPUs will do somewhere in the mid 500 kH/sec range at stock clock speeds with typical cgminer settings. The better GPUs (the top-level MSI, Sapphire, Gigabyte, and Asus cards) can be run at nearly 700 Kh/sec with overclocking. Most people shoot for the mid 600 Kh/sec range with some undervolting to save power and keep temperatures down. I’ve used the MSI TF3, Gigabyte WF3, and Sapphire Vapor-X cards personally, and all of them will hit at least 660 Kh/sec while undervolted.
Hi Cryptobadger,
First of all thank you very much for this very cool and informative guide. My first earned Litecoins will go to you 🙂
Second; are you planning on updating this guide, vis á vis hardware configuration..? I mean, as the time progresses, maybe some other configurations become more appropriate? (here I’m thinking mainly the REST of the rig, i.e. CPU, MB, etc.. – GFX should all of us be able to find out what suits us best regarding finance, avaliability, performance, OC’ing etc…)
And again, thanks alot for taking the time to help the rest of us noobs get into cryptomining.. 🙂
Cheers,
-H
Thanks for the kind words!
Yup, I do plan to keep the guide updated as time goes on – I’ll try to revisit the hardware section every few months to make sure that the recommended parts still represent some of the best current mining rig options.
Hi Cryptobadger,
I am looking to chain a few of your rigs and was wondering what, if any, of the components would be able to “doubled up” on or consolidated to support say 2 rigs.
i.e. a larger power supply to support both rigs
Any other comments and opinions about the optimization opportunities of chaining these rigs together would be greatly appreciated.
Thanks
Somebody else may know more about this than I do, but as far as I know there really isn’t much you can do here. You could get a monster 1600 watt PSU, but you’ll still be stuck because it only has a single ATX power connector, which limits it to powering a single motherboard. In theory, you could make a Y-cable yourself, but I don’t have enough knowledge to say whether or not that is a good idea.
These things are already pretty stripped down to the bare essentials, especially if you’re booting linux of a USB flash drive.
@bpbamberg I’m also planning on building 3 or 4 rigs in the nearest future.. So far I’m just thinking of having them as “individual” rigs, but if I learn some tricks along the way I’ll post ’em here.. 🙂 Hope you’ll do the same! 🙂
Good luck,
– H
Hej CryptoBadger,
Thanks for the guide.
I got impulsive some days ago after reading your guide (and browsing ofther info about mining for months), and ordered 3 7950 GPUs.
Really I just bourgth the cheapest I could get, and now sitting here with them at my table, I Wonder if that was smart, and if I will encounter limitations, esspecially with the undervolting and overclocking.
Here is what I bourght:
1x Club 13Series Unloaded, Radeon HD 7950
2x R7950 Double Dissipation
While writing I get confused if the R7950 is the right Card for this use?
I can sse that the Club 13 series have dual bias option, one (physical) switch between (position 1 – unlocked – extreme performance Bios) and (position 2 – Factory default). So I guess this Card is good for the mining.
please help me with the above, as I will return the 2 R7950 Cards, if they are not the right ones.
I am also concidering wich PSU I schould buy, as i would like to plug in a 4th Card later, I would like to know what PSU would be the absolut minimum. I read the above about this, and really got a Little confused on this matter. I guess I have to make an calculation of the watts of all units to know??
I have ordered 3 riser cables from china for maybe 25$, and are still to order the CPU/RAM/MB/PSU.
Thanks for great info, I will also donate some LTC when I finally get going….
Hi there,
I’m not familiar with the Club-3D brand, as they aren’t as popular here in North America, but really any Radeon 7950-based GPU should work fine (although you may need to tweak your cgminer settings a bit from my example to get optimal performance out of your cards). It isn’t necessary to have all of your cards be the same brand/type, although it does simplify setup a bit.
As for PSU, if you’re planning to eventually run four GPUs, I’d go with a highly-rated 1250 watt gold or platinum rated model. I normally recommend the 1250w Seasonic. You can get away with a slightly lesser model if you’re planning to undervolt, but I don’t really recommend trying to skimp in the PSU department.
Thanks for your answer. I first saw it today.
I decided to go with 3 GPUs for a start and ordered the 860w PSU that you recommend. I now ran into the problem that there is not enough power cables for the 3 GPU Cards. How to deal with this? Do I split a cable? On each GPU there is an 8-pin and an 6-pin power plug.
Other then this, then I am waiting for a few parts to come in some days: the Wireless Dongle, The Harddrive and an DVI/VGA adaptor, becourse I use an old VGA screen for the miner. I also need to install an brace to keep the GPUs in watter, not that I think this is nessesary?
After all is ready I plan to run Windows and play with undervoltage. I consider two options for location: one is on the balcony behind and Wind screan, there will be no Water, but a lot of fresh air! or in an storage room, that have an normal air cerculation channel, but I think there is a change the room will get warm, esspecially when I want to build more miners.
Any comments are welcome.
I found that there IS enough powercables for the 3 PSUs…
having difficulty with gpus
when I hook up 7970 s to board i lose the native vga output of board
have everything ready to go
board is ms-7751
vga output ok unless gpus attached, regardless of number or location
any thoughts?
great guide, thanks so much!
fixed in BIOS, working on linux update, thanks
Hi!
I was thinking to run Linux on my mining rig and want to buy all the hardware that you recommended in guide, but instead of PSU Seasonic 860w Platinum PSU to buy LEPA 1600w. I´m planing to run 5 GPUs. My question: Would it be wise idea to do that? Also, because Im from EU, Im not sure how the PSU are made for US and if they going to run in Sweden for example?
Waiting for response!
Thanks.
@BSG
The voltage in Sweden is 230 and modern computer PSU’s are all multi-voltage and multi-frequency. This makes them pretty much universal. The PSU will either have a switch on the back you can use to put in in 230v mode, or it will simply auto-switch. The higher voltage in home power outlets on your side of the pond is actually a big plus for you. It means the amperage required for your circuit to deliver the same watts will be lower. On this side of the pond, most data centers use higher voltage circuits for everything as it’s more efficient… unfortunately they are less common in homes!
Cheers.
LT already answered most of your question, but I just wanted to let you know that your choice of PSU should be fine for a 5x 7950 GPU rig. The Lepa 1600w is pretty much the most popular option for people looking to run five 7950s off of a single PSU.
Hello again CB,
I have decided to definitely go with 5 7950 (MSI 3g tf like you recommended), and the LEPA 1600 psu you also recommended. My question has sort of been touched on in these comments, but I am a complete noob when it comes to building rigs or any computer for that matter, so I was hoping for a little more clarification in regards to connecting the 4th and 5th gpus to the ASRoc 970 E4 as well as the LEPA…
First, in which slots are the PCIe 1x connectors from the powered risers going to go on the the mobo? Second, I believe that for each extra gpu with a powered riser I am going to need 2 connections from the LEPA– one to plug into the powered riser, and one for the gpu itself. Right? Which connectors from the LEPA should I use? Am I going to need the adaptors you suggested Laurent with this hardware?
http://www.lepatek.com/eng/product_content/1/1/20/
I am looking at the connections here, and unfortunately it doesn’t make a lot of sense to me yet…
Thanks again for your time and your guide… I won’t forget to hook you up with litebeers! (Although I know that’s not your sole motivation here…)
Assuming you get 1x-to-16x powered risers (the most common kind), you can plug them into any of the five PCIe slots on the ASRock motherboard. The 970 Extreme 4 has five PCIe slots: three 16x and two 1x. The 1x risers can be plugged into any of these slots – they’ll fit perfectly in the 1x slots, and they’ll only use the back portion of the 16x slots.
For the powered risers (you’ll want at least two for a 5 GPU setup), you’ll be plugging the riser’s power adapters into molex connectors on the Lepa PSU. They look like this.
I don’t own a Lepa PSU myself, but judging from the description on its product page, you shouldn’t need any adapters. It says that it has 10 PCIe power connectors, and you’ll need two for each of the five GPUs, so you’ll have exactly enough.
Just for future reference, if you ever need more PCIe connectors than your PSU has, you can convert molex connectors by way of these adapters. Just exercise caution when doing so and make sure that your PSU can actually handle the power requirements of all the components that you’re plugging into it – the number of PCIe connectors that a PSU has is generally a pretty good indicator of what it can actually handle.
Hope that helps!
Thanks so much. You have saved me (and likely others) a ton of time with my build. Cheers!
@lord
Thanks a lot!
I just found the CoinWarz site, which constantly compares the profitability of mining many different crypto currencies: http://www.coinwarz.com
Do their findings stack up with yours? Lite coin still looks good (~15 days to earn 1 BTC) but Feather coin is top right now (~10 days to earn 1 BTC).
I wrote a bit about this topic. It’s possible to coin hop and make a profit if you really pay attention.
However, many of those altcoins experience extreme volatility. On coinwarz, the 14-day average tells a much better story than the current profitability. For example, right now TRC is showing about 1000% profitability compared to BTC (!). Over the long-term though, it only outperforms BTC by ~30% (which is still good, but LTC beats it by a large margin). You can take advantage of these huge swings if you’re willing to invest the time, but many people aren’t (and frankly, unless you have a lot of hashing power and/or a significant number of coins, it probably isn’t worth it).
For people without a lot of time to monitor exchange rates, simply mining LTC all the time will likely produce the best results. LTC consistently outperforms BTC by a significant margin and doesn’t experience the extreme fluctuations that most of the smaller altcoins do. In addition, many of these “flavor of the week” altcoins ultimately amount to nothing more than pump-and-dump schemes and tend to disappear several months after their debut.
All of this information is great, I used it to build my first miner. One thing I would suggest is not even attempt using a plastic crate, there is way to much danger of melting it. After my original build I didn’t like the heat and plastic, so I fabricated my own frame out of 3/4″ aluminum angle bar. I used the extrusion based aluminum frame in this thread as my design inspiration:
https://bitcointalk.org/index.php?topic=7216.2260
I also added the additional two Frozr GPUs for five total as Part 5 of this series mentions. Make sure that there is at least 2 or more inches between each GPU, and that the closest GPU to the CPU is not directly over the CPU. You’ll need one extra 12″ riser if you do this and two powered risers for the two PCI 1X slots.
http://www.amazon.com/gp/product/B00BD70XOC
http://www.amazon.com/gp/product/B00CQBCKPY
I have two Antec Big Boy 200 200mm Tricool Computer Case Fan’s and an additional 120mm fan lined up in front of the rigs blowing air across the cards.
http://www.amazon.com/Antec-Big-Boy-200-Computer/dp/B000V6FKGM
I maxed out the memory and engine clocks to 1100 MHz for the engine and 1500 Mhz for the memory. With the extra fans and spacing, the GPU fans aren’t always engaged at their highest setting, and the internal GPU temperature in a “hot” (23.8C/75F) room stays around 78C. This has been a lot of fun, I couldn’t have gotten to this point without the tutorial.
Nice looking rig!
I do want to address the “melting danger” of using a plastic crate. The melting point of Polypropylene is 130-170C. Your GPUs will die long before reaching even the low end of that range. Keep in mind that the mounting bracket is the only part of the video card that is actually in contact with the crate, and those should always be cool to the touch. My GPUs hover around 77-78C (~40% GPU fan speed – if I crank the fans to 100% temps drop to the low 60s) with no external cooling, so even if I were to lay the the video cards with their heatsinks directly on top of the plasic, there should still be no danger of melting.
Does components of this power are really required only for a mining rig of bitcoin ?
I think the memory, power supply and GPU is a bit too powerfull (and so, expensive)
You sure there is no need to ground the motherboard? For the long run, grounding the motherboard might be helpful.
Hi and thanks for the great info!
I have a Corsair Enthusiast Series TX 850 Watt ATX/EPS Modular 80 PLUS Bronze (TX850M)
can I use it for 3 msi cards or only 2?
Thanks
If you’re planning to undervolt, then a 850 watt PSU will be more than enough.
At stock voltages, three 7950 GPUs will be right up against the limits of what a 850 watt unit can safely deliver. It’ll likely work, but you risk early PSU death by running your unit at 100% 24/7. Power supplies are also less efficient when they’re run at their limits.
I plan to under volt
Thanks!
one last question
If I only go with three cards under volted would it be possible to mount them directly on this motherboard on the three existing slots if I have them in open air?
ASRock MB-970EX4 Socket AM3+/ AMD 970/ AMD Quad CrossFireX& nVidia SLI/ SATA3&USB3.0/ A&GbE/ ATX Motherboard
Thanks Again
It’s certainly possible, but your cards will run much hotter compared to using risers & spacing them out (the difference was 10-15C per GPU for me between using risers and not). Assuming a normal ambient room temperature and the settings posted in my guide, you’ll likely be at dangerous GPU VRM temperatures without risers unless you use external cooling (a box fan, etc). Over the long term, getting a few cheap risers (or even just one riser to lift the middle GPU away from the others) will be much cheaper than powering a box fan 24/7 (about $4-$5 per month assuming a 60 watt fan and $0.10 per kWh), so I’d definitely recommend the riser route.
makes sense, thanks again!
With all the CPU only coins that have been starting as of late do you feel there is any value to getting a little bit more powerful CPU so you can mine with it too? Or do you feel the power and heat requirements take away from it?
I’d personally have a really hard time justifying the extra up-front cost, power usage, and heat generation that an expensive CPU brings to a mining rig.
If any of the various CPU-only altcoins ever truly become worth mining full-time, it’s likely that somebody will eventually find a way to mine them with a GPU. That is pretty much what happened with Litecoin, after all.
What are the odds of lite coin asics?
I would say, if/when scrypt based coins are successful enough it will only be a matter of time. However, if you look at the capitalization of the alt-coins vs bitcoin, the profit motivation is be pretty low right now. (You are taking over a billion dollars cap for BTC vs maybe 50 million for LTC, which is the second place coin right now) Plus a scrypt ASIC would not be as big a win as a SHA ASIC, though it would probably completely eclipse any GPU. The main thing would be performance per dollar and WATT. It would only make sense if it really outperformed a GPU by a large enough margin to make it compelling.
Something to keep in mind… do you really even WANT scrypt ASICs to flood the market? The rising tide lifts all boats. You wouldn’t be the only person getting more hash power. Difficulty would go up to match as the ASICs went on line. Now your mining device would not be built on a general purpose / commodity parts with a reasonable secondary market. A scrypt ASIC would only be good for one thing and it would age VERY fast. (Just like the SHA ASICs) Based on the cost of the SHA256 ASICs, the hardware isn’t going to come cheap either.
The nice thing about GPUs is they can do OpenCL, which is good for a lot of other GPGPU tasks beyond hashinh scrypt. (Like 3D rendering and general compute)
The advantage a scrypt specific ASIC would have is the architecture could be much better tailored to scrypt mining than a GPU. For example, the first thing you would do, as a designer, is figure out what percentage of the available die space to use for RAM and how much for the scrypt pipeline. That could probably be determined using simulation to test the theoretical trade offs in the scrypt algo of RAM tables vs on-the-fly calculation. The RAM on an ASIC would effectually run at cache-like speeds. If I understand it correctly, the only reason that GPUS can do scrypt fast is the massive amount of parallelism they provide, plus they use the cache the GPU does have have very effectively. A scrypt ASIC would have a much more tuned architecture with more RAM per “scrypt pipeline” and possibly even more (scrypt) pipelines than a GPU, since they wouldn’t need to waste die space on features a GPU needs in its stream and texture processors.